Sunday, November 16, 2014

Snow...


Over the past few days, I have reluctantly been removing all the liquids from Big Trill, knowing I won't be heading south any time soon. So sad. I really wish I was on my way. I hate the idea of being here in November when it's trying so hard to be winter, but can't quite manage it. Oh well, once the snow is here to stay, I will be happy again!

Here and there I have found lady bugs and cluster flies hiding in nooks and crannies, they too don't want to be here, but like me have no where to go. 

At least I have an escape plan organized. They don't seem to have one as far as I could tell...


Saturday, October 25, 2014

No Time To Travel


Here we sit, campers without a road, stuck in time, waiting for the next adventure! Oh well, it won't be forever and when the road opens up, there will be miles and miles of smiles ahead. Just hope it happens soon...

Thursday, October 16, 2014

Hitching Up, Baby!


Backing up your tow vehicle to hitch onto your trailer is always problematic, especially when you're alone. There's no one to provide you with information on how close the hitch ball is to the receiver unit on the trailer. What to do...?

There are a number of gadgets out there from magnetic balls on sticks to fancy and expensive backup cameras. There is also the free baby monitor.

Yes, a baby monitor! If you have two units like an iphone and an ipad or similar Android devices, which can 'speak' to each other via Bluetooth, then using a free baby monitor app you can send video from your trailer hitch (called the 'baby') to you in the tow vehicle (called the 'parent'). Watching the screen, you can tell where the ball and receiver are and flawlessly inch your way right to the perfect spot without having to constantly get out and check and re-adjust. The only time I have to get out now is to adjust the height of the receiver unit if I have left it too low to drop onto the ball once I'm in place.

Another use for the baby monitor is when backing into a parking site or camping spot. In this case mount the 'baby' unit on the rear of the trailer (I do this using a cheap suction cup device) and monitor where you are backing into via the 'parent' unit in the car. You will probably have to play with the 'baby' device to get the best view in the 'parent' screen, but once you get the hang of it, its easy to set up and use.

Thank you baby!

Tuesday, September 30, 2014

The Cost of Speed


One of the fastest cars at the Autumn Classic Car Races at Le Circuit Mont Tremblant last weekend was this orange coloured McLaren. At the moment seen in the photo it was probably going around 150 miles per hour, perhaps a little less having left the pit straight and beginning to set up for a series of corners just up ahead. It might be a fun car to own, but then I got thinking about his fuel consumption...

Driving the 280 kms to Mont Tremblant I had left later than expected and consequently pushed it a bit more than usual, averaging roughly 90 kph along mostly multilane highways. I was a bit shocked to notice my gas consumption was high, 12.6 liters per hundred kilometers (lphk) in fact. Without a tow, my car averages just over 9 lphk at that speed, so towing Big Trill was making a big difference. Or did it...?

On the drive home, there was no rush, so I backed off the throttle and lowered my average speed to around 80 kph. By the time I passed through Montreal I noticed consumption was running around 8.6 lphk, a drop of 4 lphk! The cost of going just 10 kph faster was dramatic!

The road from Montreal to home heads gradually up a series of long hills, so consumption increased again,  giving me an over all figure of 9.4 lphk for the trip home. Still a healthy drop from the outward trip of over 3 lphk. While that might seem much, over a longer trip, the savings can add up when a liter of gas can cost $1.40 and sometimes more. There is definitely a cost to speed! I think I'll cancel the McLaren purchase...


Monday, September 29, 2014

Trilling Races!


Big Trill and I headed off to Mont Tremblant this past weekend to see some vintage car racing amidst the coloured splendors of a Quebec autumn. We were joined by a 1973 Winnebago 'Brave' motorhome for the event. While we parked at a local campground at night, we used the 'Brave' as a base of operations during the day, positioning it with a view of the race track so we could wtach the action in the shade and closeness to  basic facilities...


Each morning of the weekend there was fog hanging low over the track , but this worked in our favour as we could park with a commanding view long before other spectators arrived to crowd us out.


Once the air cleared, the views of the surrounding hills were gloriously colourful, sunny and warm. Perfect for relaxing to the wailing of race car engines tearing up the track below us. Luckily I only do this every 30 years or so. I don't want to know how the millionaires living in the area manage to put up with it. When the track was first built it was miles from anywhere. Who would have guessed that it would later turn into a world class ski and summer resort area...?


As the morning fog lifts, the first cars appear on the circuit. The racing begins. We settle in for a weekend of pretending we're still kids and adulthood is a trap...

Friday, September 19, 2014

Hot Water!


With the weather turning colder, it's time to think about ways to keep warm. For the fun of it I got out one of these portable solar shower bags and have left it on the camper roof for the day. We'll see how much heat it puts out this evening when the temperature is expected to drop to freezing and below. 

At worst, hopefully I won't have to heat water to wash dishes!

Monday, August 18, 2014

Housekeeping...


One of the first things to learn when camping in a small trailer is that whatever mess gets created is out there for all to see...

Does this mean I'm about to become a tidier person? Time will tell I suppose! This photo shows what the first week has produced. Will week two be better or worse?

Sunday, August 17, 2014

Power Watch


It's been dark and rainy the past few days so the battery has done most of the work powering Big Trill. When getting up in the morning I noticed two things. First, I had forgotten to turn my outside light off. Second, with it using 1 amp of electricity each hour, the battery voltage was hovering around 12.1 which is about 50% capacity or so. Normally the voltage is around 12.6 or higher and the battery charge is above 80%.


When the fridge turns on it draws 2.5 amps for a short period, but the voltage remains constant. 


Once the fridge turns off and the sky brightens up a little the voltage goes up a little, a good sign! This has been the pattern during this period of rainy days.

The good news is the 50 watt solar panel has been able to maintain power and can do so probably indefinitely if I'm careful with my power consumption. 

Monday, August 4, 2014

The Road!


The road has been calling for a while now so it was only a matter of time before wheels began turning and big Trill rolled down the driveway to set out on her trial run. 


Here she is in her first campsite. Solar up and running, water working and we've settled in with no trauma to speak of. Water is nearby so I went for a swim and enjoyed a few beers with the locals. Life appears to be good!

Tuesday, July 29, 2014

Love A Little Sunshine!


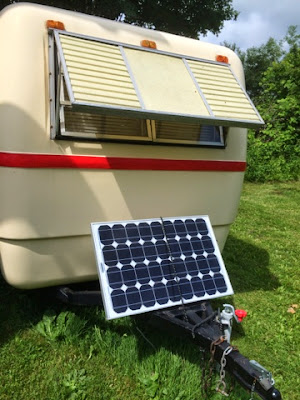
Solar panels like the 50 watt panel in the photo are becoming more and more affordable so it makes sense to add one or more to a camper/trailer these days to augment whatever battery charging arrangement you might have. I have bought two such panels over the years, the second one costing less than half what the first one cost only a few years earlier! In addition to this panel, I have a 40 watt flexible roll-up panel from my kayaking camping days which I can also use. It is more efficient than the unit seen in the photo especially on cloudy days or when camping in shady spots. The panel is not permanently fixed in place, so I can move it to a sunny spot wherever that might be.


Both panels connect to the 12 volt circuit via the external socket seen in the above photo. I also have a pig-tail which allows both panels to be plugged in at the same time if need be. These socket type connectors are not ideal nor weather-proof, so I am presently in the market to replace them with better connectors designed for all weather solar systems, however they serve the purpose for now.


Before the solar produced electricity enters the trailer electrical circuit, it passes through a 'controller' which prevents over-charging of the battery. The next item one really needs in a 12 volt system is an instrument which tells you the state of your battery's charge and how much current you are using. To stay in peak condition, it is best not to run a battery down too low. This unit in the photo allows me to see how many volts of power I have coming into the battery, the state of charge as well as the number of amps being used. It will also tell me how long I can continue to use amps at the current rate of consumption. All very handy information!

That's really all there is to a solar powered electrical system other than at least one deep-cycle battery which can store the electricity. The larger your storage capacity and the lower your consumption, the longer you can camp 'off the grid' as they say. Being careful not to overdo it using all LED light bulbs and an efficient fridge, I can stay 'off' indefinitely...

Sunday, July 27, 2014

It's A Jungle In There...


When I picked up the Trillium from the previous owner, it was set up to run only on 120 VAC power. That is, without being plugged in to 'shore power' at a campground or such, there was no electric power at all. However, when the trailer left the factory, it had been wired for both 120 VAC and 12 VDC power. The question was, what had been changed over the 37 years of previous owners? Was any of the original wiring still intact?

It was nearly impossible to find out as all the wiring was hidden behind various built-in cupboards and seats and floors. Using a camera I began documenting all the wiring by randomly sticking my arm into nooks and crannies and snapping away. By doing that and piecing the puzzle together, I discovered in the upper photo that the old DC wiring was there as well as a fuse even if I couldn't reach any of it easily.


Some wiring like that seen above was easier to see and reach. This is a mess of wiring behind the cupboard beneath the sink, which includes running lights from the tow vehicle, 120 VAC wiring for the fridge, and 12 VDC for the lights above the sink and stove. Nothing labelled of course, all in a confusing jumble!


All the wires eventually led to or from this unit, the Power Converter. It was here that the 120 VAC was converted into 12 VDC which in turn ran the interior lights and fridge. I chose to bypass this unit so that today, the two electrical circuits are totally separate. The 120 VAC will still power the fridge if I wish and a reading lamp and some power outlets. All the 12 VDC power, except the running lights which are tow vehicle powered, is supplied by a deep cycle battery which is recharged by a 50 watt solar panel outside. The panel can be plugged in and moved about to take advantage of the sun's position depending on how the trailer is parked. So far it's all that's required to power the day to day operation of the Trillium. I'll get to the solar set up in another posting.

Changing Fridges


The original fridge in the Trillium was a three way (110/12/propane) device which had long since seen its day when I bought the trailer. The seller claimed it worked, but it didn't really. Not only that, but it was much too finicky for my liking, having to be always level and so on.

It was tossed out and an Engel unit which I had from my Teardrop days moved into its place. This chest fridge works on 110 and 12 volt, but not propane. The good news was it doesn't require it to be particularly level and draws so little power, I can run it off a 50 watt solar panel indefinitely!


I installed the Engel on a slide out base using the clip in base which Engel supplies. This base prevents the fridge from suddenly becoming a projectile should one stop suddenly and, shudder the thought, crash.


The smaller outside dimensions of the fridge, even with the additional 'blanket' allowed me to add an extra drawer above it and a slide out waste basket to the right.

Saturday, July 26, 2014

Belly Tuck


The Trillium is made in two halves joined in the middle. The outside of the joint is finished off with the metal band seen in the photo. Sadly over time this joint leaks due to the way the band was attached. So...


Off it came. Next step was filling the gap with fiberglass paste and then finishing it off with Bondo and a paint job. 


Voila! New joint and no more leaks. Did I mention the fridge had issues...?

Wednesday, July 23, 2014

I Don't Do Windows. Usually...


It soon became obvious that the windows leaked in Big Trill. The previous owners had solved this problem by applying layers of silicon seal around the frames and probably swearing a lot when the leaks continued. I had no choice, but to remove the windows and see what could be done. In the photo above, the problem got bigger. It was going to take more than a bit of new silicon seal...

The leaks had been going on long enough to completely rot away much of the inner wooden frame to which the metal window frames were attached. With no purchase for the mostly rotten screws holding everything together, the windows had little choice other than leak more and more...


Each window suffered this same problem to a greater or lesser degree, so all the old wood was removed and new was fitted. The rear window I replaced exactly as it was done originally, however, the side windows got a different treatment. Originally the inner 'skin' covered the wood hiding it from view. I suspect this also allowed it to quietly rot away unseen and unattended to over the years. In the right of the photo above you can see I chose to keep the wood frames in sight, tucking only a little bit of the 'skin' under so that a good seal was attained between the outside metal window frame and the fiberglass 'hull' of the trailer.


Each window was re-sealed with fresh butyl sealant tape and re-screwed in place, this time with stainless screws.

Guess what? The trailer still leaked! Not as badly, but little puddles formed after each rainstorm, so the hunt was on for the source...

Sunday, July 20, 2014

Stick out your tongue!


In the photo above, Big Trill's tongue hitch arrangement can be seen as it was when I bought her. This set-up allowed for her to come in contact with the longer of my kayaks when traveling, a situation both dangerous and destructive. The solution was to lengthen her tongue and so I got a local machine shop to do exactly that.


Here you can see how the old hitch was removed and a new section was welded in. In fact this photo isn't Big Trill, but was the template I took to the shop to show them was what required.


Here is Big Trill's new longer tongue. As you can see, I also replaced the original jack as it was becoming somewhat cranky and who needs that on the extended trips to come. It turned out the old ball hitch was very much worn and on its last legs. Maybe this trailer did travel to both coasts after all, and maybe it did so more than once...!

So the door fell off...


It wasn't long before Big Trill, as I named her, began to make her presence known and started to demand some attention. Returning home one day, I noticed the door on the ground instead of in its usual spot. A closer examination reveals the problem...


It turned out that the screws holding the door hinges to the trailer had long ago succumbed to rust and for the most part were barely holding on to anything. No wonder the door fell off! I'm lucky it hadn't occurred on the long drive home from Orleans...!


I removed the old screws, plugged the holes on the door frame with an epoxy mixture and rehung the door this time using stainless steel screws. At some future point, I know I'll have to attack the problem from the inside and replace the wooden door support, but for now, the door is firmly secured to the trailer and I can get at the next item on the rapidly growing restoration list.


First Sighting


Heading back from a weekend of paddling in Ontario, I noticed this Trillium 4500 camper for sale in Orleans, Ontario. The owners had recently purchased a huge gooseneck trailer and were anxious to sell so they could head out on new adventures.

They claimed to have driven the rig to both coasts, east and west over the 10 years or so of ownership. Maybe they had, but sellers can get carried away sometimes. Certainly I was soon to discover there was much to do to make the camper livable, things which must have bothered the previous owners a lot...

Driving it off their property I came face to face with issue number one. The trailer and my 17 foot kayak became kissing cousins each time I turned to the right. Not good...

Saturday, July 19, 2014

Big Trill Begins a New Life


'Big Trill' is a Trillium 4500 camper/trailer built in 1977 in Markham, Ontario. Who first bought her and where she's traveled over the years is a mystery, but suffice to say I bought her in 2012 in Orleans, Ontario and have been slowly fixing her up ever since. She's nearly ready for her maiden voyage and this blog will be about her future travels while she stays in my possession. Needless to say, I have big plans...!

Before beginning however, I'll walk you through some of the upgrades and modifications she's been through during the past year or so.

I hope you will join me for this 'Trilling' Travelogue!